

TX200 Trigger Adjustment
by Clifford Smith
Reprinted the March 1993 and February 1998 AAFTA News.

click the ad to visit this advertiser, View All Advertisers On This Page
It is difficult to understand how to adjust the trigger on the TX200 by following the User's Handbook, or to understand how the trigger operates by looking at the exploded parts diagram. The following may clear some of the fog. There are sure to be other adjustment techniques, but this works for me. First a basic summary of what happens, then some detail.
-
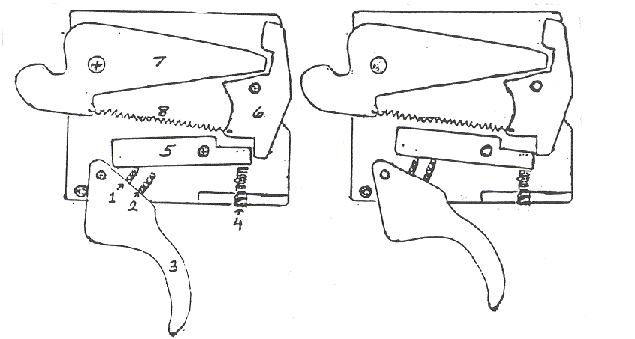
1. First stage screw
2. Second stage screw
3. Trigger blade
4. Trigger pull weight screw and spring
5. Bottom sear
6. Middle sear
7. Top sear
8. Top middle sear spring
The trigger (3) and its adjusting screws (1), and (2), act as a lever, lifting (actually rotating) the bottom sear (5) clockwise against the tension of the trigger pull weight spring (4). When the bottom sear rotates enough for its right hand edge to clear the middle sear (6), the middle sear rotates clockwise due to tension of the top/middle sear spring (8). This action releases the top sear (7), which rotates counter clockwise to release the piston assembly. The piston then hurls forward in thecompression tube blowing your favorite pellet toward the target. If you have estimated the range, wind, and trajectory properly, and held the rifle correctly, using proper trigger control, the target may even fall down.
The first stage trigger screw (1) and the second stage trigger screw (2) do the same thing. They lift the bottom sear. However, the first screw is closer to the fulcrum (the trigger pivot) which gives you more leverage. As the trigger rotates, the second stage screw contacts the sear and the point of effort is now on the second screw. It is this point of transfer that begins the second stage. You feel this with your finger as the second stage screw is further from the fulcrum, thus needing more effort to lift the sear. The trick of adjustment is to use the first stage to rotate the bottom sear, for most of the travel, and just have a wee bit of travel left for the second stage. If too much is left for the second stage, you will feel creep.
You must cock, load and fire for each try of the trigger adjustment; so, make sure you do this in a safe place with no distractions.
I start by unscrewing the second stage screw (2) until the first stage fires the rifle, by itself. This is easily felt; the second stage will be completely missing with its screw backed out enough. Now screw in on the second stage screw about 1/8th turn per try until you can feel asecond stage. An additional 1/8 to 1/4 turn should give overlap of thebottom and middle sear for safety, with no creep. If you play with the first stage screw in order to get more or less first stage travel, you will have to redo the second stage adjustment. There is a phenolic button in the threads of the trigger acting as a locking mechanism on the screws; so, once the adjustment is correct, it should stay that way.
Want to adjust the weight of the trigger pull? That screw is to the rear of the trigger, under the trigger guard. Remember to tighten the rearguard screw first when replacing the guard. REMEMBER THE AAFTA RANGE SAFETY RULES: "3-C when cocking spring air guns, the shooter must hold the cocking lever or barrel while inserting a pellet." FINGERS HAVE BEEN LOST!
Own a TX-200 SR (semi-recoilless)? It's basically the same, except the stage (1) and stage (2) screws are not in the trigger blade; but, they are in the trigger bar above the trigger. There is a single screw in the trigger that is adjusted for "no play" when the gun is cocked. This screw operates on the trigger bar when the trigger is pulled.
Back to General Airgun Information
Back to American Airgun Home
Top of Page

click the ad to visit this advertiser, View All Advertisers On This Page
© Copyright 2006 by Brad Troyer & American Airguns