
The Daystate Harrier
By Brad Troyer
click the ad to visit this advertiser, View All Advertisers On This Page
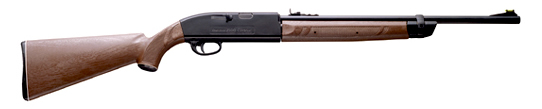
As life goes on, technology improves everything around us. Computers, stereos, cars, and just about everything else you can think of. The same is true of airguns. This is especially true of the precharge pneumatic airguns. The quality and accuracy of today's gas guns are incredible. Unfortunately these guns are typically the most expensive on the market which keeps them out of reach of many airgunners. Recognizing this need, one of England's' most renown airgun manufacturers, Daystate, has develop a new precharged air rifle that targets the entry level precharge airgunner. That rifle is, of course, the Harrier.
The Harrier follows the Daystate tradition of high quality and solid performance that has built a loyal following of airgunners worldwide. Up to now, all of the Daystate air rifles where finished with a beautiful, high polished finish. Finishing each rifle to a high polish requires several manufacturing steps and is rather expensive. The high polish is beautiful, but a lot of airgunners care less about the finish and more about performance.
Daystate took this idea and developed the Harrier. They removed the high polish finish and replaced it with a shot blasted matte finish. In doing so, they also eliminate six separate manufacturing processes and a chunk of the cost of the rifle. The looks and guts of the Harrier remained basically unchanged from their other rifles. This further reduces the cost and increases the reliability by reusing proven components from the Huntsman and LR90.
If I were going to design entry level gun, I would want it to be usable by as many shooters as possible. The design should be such that all shapes and sizes of shooters can handle and shoot it well. Daystate accomplished this by making the Harrier ambidextrous and designing the stock to fit a wide array of shooters. The fact that it is ambidextrous should make it very appealing to left handed shooters who want a quality precharge rifle but don't want to spend the extra money usually required for a left handed stock.

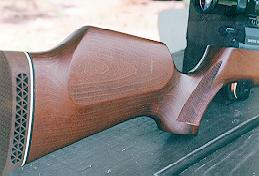
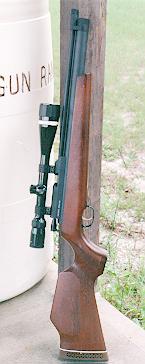
The stock on the Harrier is made of walnut stained beech. The grain on the test gun was outstanding. The stock comes standard with a ventilated butt pad and whiteline spacer. The real feature of the stock is the fact that it is designed to be truly ambidextrous . The raised cheek piece is exactly the same on both sides of the stock. The cheek piece is cut high but doesn't protrude outward much. I found that it only contacted a small portion of my cheek while shooting in the seated position. In every other shooting position their was more of the usual contact between cheek and gun. Although I would prefer the cheek piece to be a bit fuller, the height was right on and put your eye right in line with the scope.
The Harriers' grip is angled nicely and has a slight palm swell on both the left and right grips. Slipping my hand onto the checkered grip, I found that my finger found the trigger comfortably and without much reach.

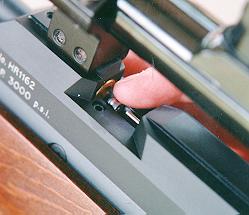
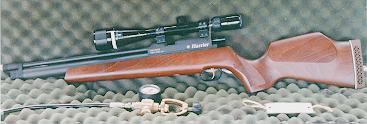
The alloy breech block on the Harrier is a massive unit. It is finished in the same matte finish and has a sufficiently long scope rail machined into it. I had no trouble mounting a Bushnell Trophy 6-18x scope on it. The loading port had ample room for loading the pellets from either side of the gun. The groove was a bit over size to accommodate pellets up to .25 caliber. I had some trouble keeping the .177 pellets from tumbling forward while loading them. The gun had to be held pretty much level for them to feed correctly. Another problem I had loading pellets is the two screws that are positioned on either side of the loading port. The pellet head tended to bind up on the breech block screws while rolling them into the loading port. This was a minor thing, but it would be nice if the screw could be capped or moved back out of the way.
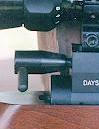
The Harrier uses a sliding bolt for cocking and loading, just like the other guns in the Daystate lineup. The cocking lever itself was not the most attractive unit on the market, but it is very functional and gets the job done. The cocking lever requires only a quarter turn and a light pull and the gun is ready to shoot. The cocking handle can also be replace with a swan neck handle if you so choose.
The trigger unit on the Harrier is the same two stage adjustable trigger unit that is used on the Huntsman and LR90. It is adjustable for let-off, first stage travel, and second stage stop point, and trigger angle. Before testing the Harrier, the trigger was adjusted to lighten the let off and remove any hint of creep. I found that it crisp and broke cleanly.
The Harrier is available in .177, .22, and .25 calibers. Another neat feature of the Harrier is that your aren't limited to a single caliber once you buy it. The Harrier is designed with interchange barrels for different calibers. There are two pieces to the barrel assembly, the barrel and the brass throat which also contains the transfer port.
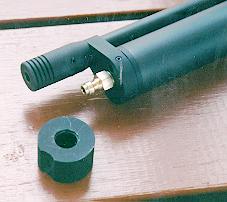
Changing the barrel is pretty straight forward. Just loosen the two grub screws on top of the breech block and slide the barrel off the gun. Now loosen the four breech block screws and remove it. Take out the brass throat and install the brass throat for the new barrel. When you install the brass throat make sure to line up the transfer port on the brass throat and breech block. Now reinstall the breech block and then the new barrel.
Charging the Harrier was very simple. It comes standard with a quick connect charging connector. The charging connector is also part of the inlet valve which allows quick changing of the valve, should a problem arise, without having to disassemble the gun.
The test rifle was shooting around 18 Ft. lbs. and I found the optimum charging pressure to be 2600 psi. The power level is easily adjusted using two grub screw located on the back of the air reservoir. I decided to adjust the test gun to the maximum power level. I removed the one hex bolt that keeps the action in the stock and quickly adjusted the power level to the maximum. At this setting, the Harrier shot the 10.5 Premiers around 925 fps. I adjusted the power level back down as low as the grub screws would allow before I started any formal testing. The power can be reduced further if so desired, but it requires a few internal adjustments.
Before I began the formal testing, I shot the Harrier informally. I plinked with the Harrier at some of my standard practice/fun targets like little green army figurines, shotgun shells, and cheez balls. I found that I was able to hit them at 50 yards as consistently with the Harrier as with any of my other airguns. I wasn't really expecting that kind of accuracy, but the Harrier really produced.
After I felt comfortable with the gun, I set off for the range to perform some formal tests. As expected, the Crosman Premiers shot the best in this gun, averaging just over 3/4" at 50 yards. The Kodiak and Premier 7.9 were right behind at about 1" groups. This was much better than I had expected and I would expect the accuracy to improve with a reduction of the power level. One thing I found was that many of the groups were 1/2"-3/4" for three or four of the shots and one or two would be flyers that opened up the group. At 18 Ft. lbs., the Harrier put out 25 usable shots.
| Crosman Premiers 7.9 |
Crosman Premiers 10.5 |
Beeman Kodiak Match |
|
|---|---|---|---|
| Average Accuracy | 0.93 | 0.79 | 0.98 |
| Smallest | 0.5 | 0.625 | 0.5 |
| Largest | 1.25 | 1.25 | 1.5 |
| Crosman Premiers 7.9 |
Crosman Premiers 10.5 |
Beeman Kodiak Match |
|
|---|---|---|---|
| Average Velocity | 975 | 877 | 879 |
| Standard Deviation | 9.19 | 3.08 | 2.93 |
| Highest | 986 | 880 | 884 |
| Lowest | 957 | 872 | 873 |
| Extreme Spread | 29 | 8 | 11 |
| Weight | 7.9 | 10.5 | 10.6 |
| Energy | 16.7 | 17.9 | 17.9 |
Shooting the Harrier was great. It was light, weighing in at under 7 lbs, and very well balanced. It handled very nicely. I found that it was very comfortable in all shooting positions. It did have some noticeable muzzle flip during the firing cycle. This is to be expected considering the high power output and it's overall lighter weight.
I took it into the woods for a little simulated hunting. We aren't allowed to shoot any critters on our club property, but I did manage to kill quite a few pine cones and clay pigeons left over from the sporting clays folks. The Harrier handled very well in the woods. The Harriers light weight and compact length of 35 inches helped out significantly. It came up quickly and I was able to get on target easily.
Overall the Harrier has a lot to offer for a entry level precharge gun. You get a lot of performance for not a lot of money and that makes the Harrier is a good value. A good value is one thing that technology will never change.

click the ad to visit this advertiser, View All Advertisers On This Page
The Daystate Harrier Specs
| Model | Harrier |
|---|---|
| Manufacturer | Daystate, England |
| Type | Pre-charged Pneumatic |
| Caliber | .177, .22, .25 |
| Energy | 18 ft. lb. tested |
| Overall Length | 35" |
| Weight | 6.8 lbs. |
| Barrel | 16" |
| Sights | None |
| Stock | Beech, Ambidextrous |
| Safety | none |
| Trigger | 2 stage adjustable |
Back to Review Page
Back to American Airgun Home
Top of Page

click the ad to visit this advertiser, View All Advertisers On This Page
© Copyright 2006 by Brad Troyer & American Airguns