 American Airguns Blog
Saturday, March 05, 2005
Making Field Targets
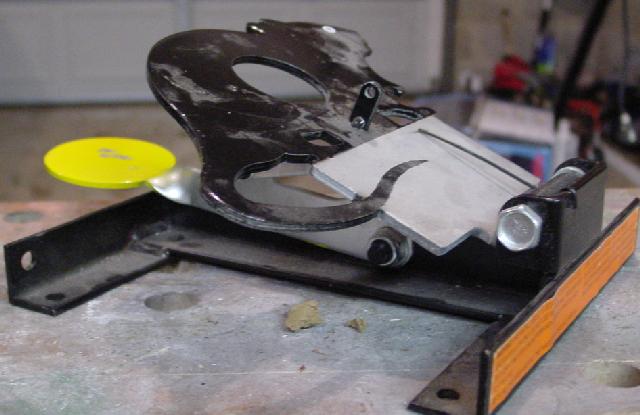
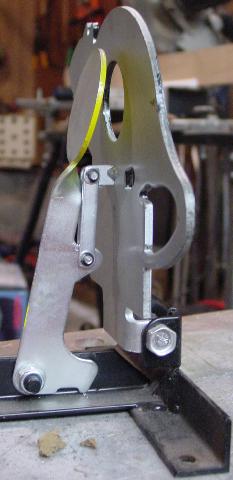
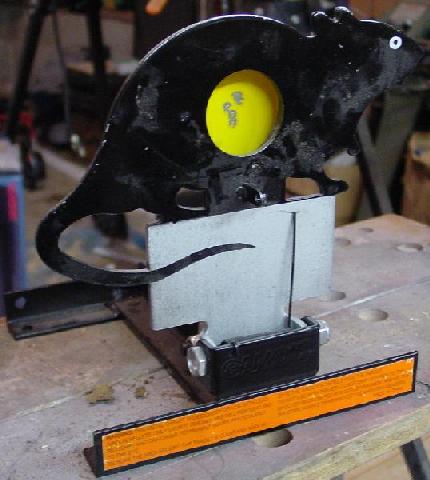 I have been a busy bee getting targets ready for the new Field Target season, our first TVA club match takes place on March 19th for anyone wanted to come shoot with us. I have been fixing older targets and making a few new ones. Gamo started making two field targets base on a British design. They only have two face plates, a rat and a squirrel, and only a 1 1/2" kill zone size. They work pretty well, they fall pretty flat with about 3 ft. lbs of energy but the paddle and face don't look like they are up to some of the high power rifles shot on many courses these days.
 One day while I was talking with Dick Otten via email, he had a good idea. The targets only cost $20-$25 and the action seems to work fine so why not just cut off the face plate and put my own faceplates on them. I thought that might work fine and save me a lot of time. So I am going to buy one more Rat target and give it a try. Basically what I am going to do is just cut off the face up each side of the base of the faceplate to just below the killzone. Then all I have to do is weld on my own face plate and probably add some extra steel to the paddle. Once I get it down I will report my finding in this space.
Friday, March 04, 2005
Antique Airguns
I have always been facinated with the antique airguns that were made in the 18th and 19th centuries. I never had a lot of time to do research on them myselft but alway enjoyed reading about them in various publications. Most all that I have read about were PCP rifles, I don't know of many or any airguns of that period that were spring powered. For me, the fact that the gunsmiths of the day were able to make PCP rifles that didn't leak or explode is facinating.
What sparked my blog today is an email that I got from Dr. Beeman yesterday. Somehow I have been fortunate enough to get on one of his email lists and his email yesterday was about an article he is developing about Austrian air rifles. I had read somewhere that Napolean had decreed that any Austrian soldier that was found with an air rifle would be execute on the spot. This was because the air rifles that the Austians were using at the time were accurate and powerfule enough that they could snipe at Napolean's forces and were killing and demoralizing his troops. The airguns the Austrians were using allowed them to shoot from a hidden spot and not give away their position with a big plume of smoke that would be emitted from a firearm of the time.
The Austrian air rifle article is about the Girandoni style air guns which had a 20 shot magazine for rapid fire and the reservoir was the buttstock. Antique airguns appears to be one of Dr. Beemans favorite areas of airgun research and I for one enjoy reading about his articles about them. He also has a few other articles about the Lewis and Clark airguns (Part 1, Part 2) and other general aricles about himself, Beeman History, and other interesting general airgun info (http://www.beemans.net/). It is a good place to bookmark and checkout from time to time.
Wednesday, March 02, 2005
Reset String Spools
After years of shooting field target I have finally come up with a fairly easy method of minding my reset string. When I started out then years ago now I made H shaped string holders out of plywood and stuck a nail in each side of the H for winding purposes. These worked well for a lot of years, they could be would quickly by hand or stuck into a cordless drill and wound up even faster. The only down side was unwinding them, you could only do two strings at a time and then you had to let them flop around as you walked back to the lane from the target. Inevitably they would get caught on branches or briars and such.
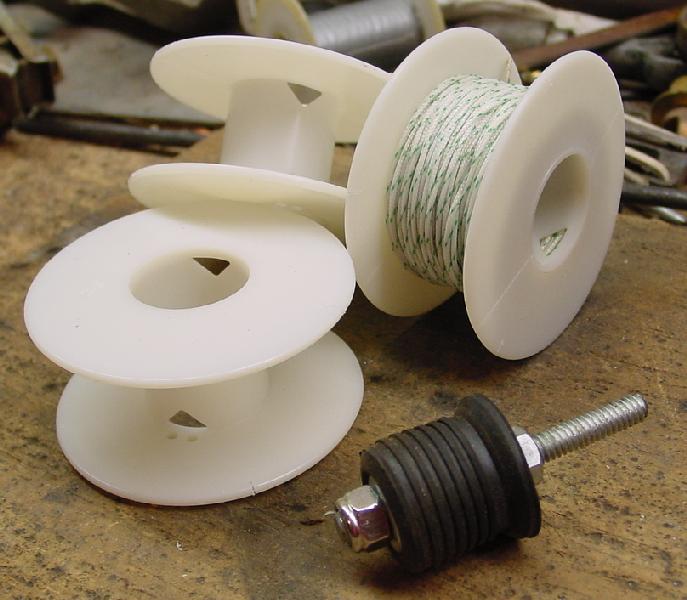
A few years after getting a club going in Florida Alan Otsuka gave me about 20 spools that he made from PVC pipe and some sort of plastic for sides. Unwinding them was really easy since you could put up to 4 spools on a 12" spike and unwind the whole lot of them as you walked. These worked well but tended to break rather easily when a shooter would get up from a lane and step on them and winding them up required a machined arbor with O-rings on it, which I only had one of.
Ahhh, the wonders of the web. Last year I decided it was time to replace all of my aging string holders. I started a search on the web for some sort of prefabricated string holder that I could buy and use easily. I discoved two companies that make plastic spools for wire and solder companies. I found that they had a couple of spool sizes that might work and ordered some samples. Some had large flanges with smaller spindles and some were just the opposite. What I settled on was a 2 1/8" flange, 1 1/8" barrel traverse and a 1" bore. They also had a 2 1/8" barrel traverse but I found that the 1 1/8" gave me plenty of room to fit 60 yard of 50 lbs or 80 lbs test Dacron line. If I had more than 60 yards or a higher test I would have gone with the 2 1/8" barrel. I had to buy them in a lot of 450 spools so I have plenty of left overs. If anyone wants to buy a set of 25 or 50 please email me.
 Another great discovery I made was a simple make-it-at-home arbor that I can use with the new spools. I found that Walmart sells a brass 1" boat drain plug in the sporting good department.
  I has a 1" diameter and about 1" length rubber stopper that I put onto a threadded rod with 1/4" nylocks and bam, I have an adjustable arbor that I can make for under $5.
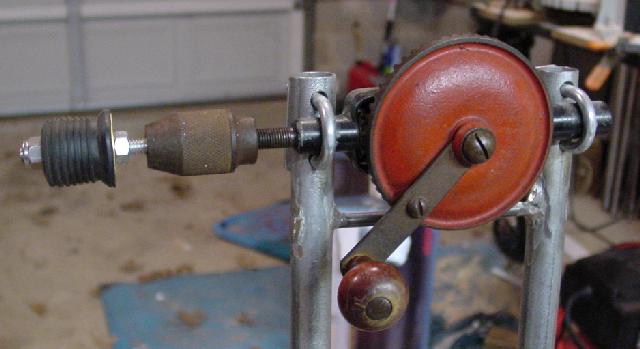
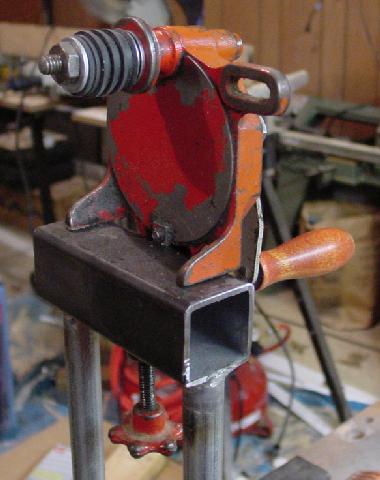
While all this was going on I decided that I wanted to get away from having to tote around my cordless drill and worry about the batteries going dead on it. I search the net for ideas and found that old manual hand drills would turn the arbor at a 4:1 ratio and found some on ebay for next to nothing and tried them out. The work good but I found a couple of old hand grinders that turn at a 9:1 ratio and really wind up the string pronto. I made up several holding fixtures for the drill and grinder winders and find they work pretty well. Over all I am pretty happy with my new string holders and winders, they make string management easier.


A few years after getting a club going in Florida Alan Otsuka gave me about 20 spools that he made from PVC pipe and some sort of plastic for sides. Unwinding them was really easy since you could put up to 4 spools on a 12" spike and unwind the whole lot of them as you walked. These worked well but tended to break rather easily when a shooter would get up from a lane and step on them and winding them up required a machined arbor with O-rings on it, which I only had one of.
Ahhh, the wonders of the web. Last year I decided it was time to replace all of my aging string holders. I started a search on the web for some sort of prefabricated string holder that I could buy and use easily. I discoved two companies that make plastic spools for wire and solder companies. I found that they had a couple of spool sizes that might work and ordered some samples. Some had large flanges with smaller spindles and some were just the opposite.
 What I settled on was a 2 1/8" flange, 1 1/8" barrel traverse and a 1" bore. They also had a 2 1/8" barrel traverse but I found that the 1 1/8" gave me plenty of room to fit 60 yard of 50 lbs or 80 lbs test Dacron line. If I had more than 60 yards or a higher test I would have gone with the 2 1/8" barrel. I had to buy them in a lot of 450 spools so I have plenty of left overs. If anyone wants to buy a set of 25 or 50 please email me.
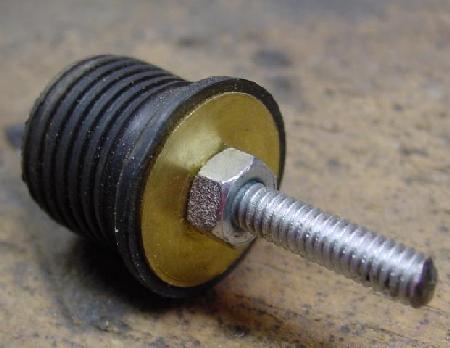 Another great discovery I made was a simple make-it-at-home arbor that I can use with the new spools. I found that Walmart sells a brass 1" boat drain plug in the sporting good department.
 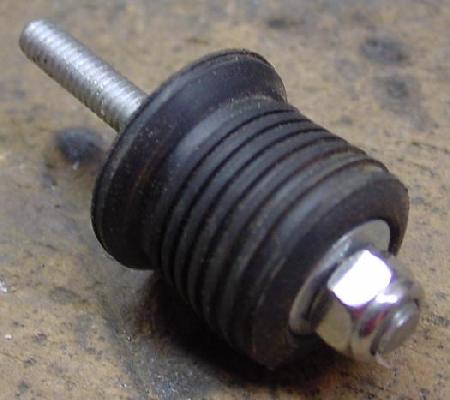 I has a 1" diameter and about 1" length rubber stopper that I put onto a threadded rod with 1/4" nylocks and bam, I have an adjustable arbor that I can make for under $5.
While all this was going on I decided that I wanted to get away from having to tote around my cordless drill and worry about the batteries going dead on it. I search the net for ideas and found that old manual hand drills would turn the arbor at a 4:1 ratio and found some on ebay for next to nothing and tried them out. The work good but I found a couple of old hand grinders that turn at a 9:1 ratio and really wind up the string pronto. I made up several holding fixtures for the drill and grinder winders and find they work pretty well. Over all I am pretty happy with my new string holders and winders, they make string management easier.
Tuesday, March 01, 2005
Scope Cant
I am surprised how many shooters don't know about or don't understand the affects of scope cant. It is very important to keep the rifle vertically centered over the bore of the rifle when shooting, especially if you are shooting at longer distances. The affects of scope cant become more pronounced as the range increases but the overall affect is to cause the point of impact to shift in the direction of the cant and down. At shorter ranges the average shooter may not even notice the affects of cant but with smaller targets at longer ranges, introducing just a little bit of cant when aiming at a small critter or target can amount to a missed shot. For a more in-depth desription, please read these references: 1, 2.
The only really good way to prevent scope cant is to have some type of level on your rifle. It is very easy to cant the rifle without really know it. In the woods or on the range, the backgroud around the target can give you a false sense of the horizon and miscues as to what is really vertical. This will cause you to cant the rifle to attain what looks like a vertical reticle but in reality the scope is canted, perhaps only slightly but it is still canted. I have seen this during Field Target matches where I am focused on the target and things look great and then I check my level and find that the bubble is pegged to one side or the other.
There are a lot of scope levels on the market these days for all types of rifles. B-Square has a level that mounts right on the scope rails while BKL Technologies has one that screws into the side of their mounts. There is a company called ScopeLevel that has a level that mounts to the scope and raises up above the scope about two inches so that is can be seen by the eye looking through the scope. If you want to go first class you can buy an electronic level from called Microlevel from Long-Shot Products which will electronically show you when your scope is level. I use a simple scope mounted level that points out to the side. It is just a scope mount with the base removed and a hole bored into the base where a bubble level is glued in. It works great and just about anyone can make one if they want to do it themselves.
If you shoot at a fixed distance and hold the rifle the same on every shot, cant won't affect you. The scope or sights can be dialed in to that range and the pellets will hit the same spot every time. But if you shoot at varying distances or use target turrets and change the reticle during your shooting, you will want to get a level.
Monday, February 28, 2005
Scope Mounting And Alignment
Over the years I have mounted a bunch of scopes on various rifles, both air powered and powder burners. The biggest trouble I have had is ensuring that the scope is vertically centered over the barrel and then making sure that the scope crosshairs are perfectly vertical. Getting everything lined up vertically is very important and keeping them aligned vertically while shooting is even more important. Hitting what you aim at becomes more difficult with a misaligned crosshair.
Aligning the crosshairs vertically is a bit easier since a plum line can be hung 10-15 yards downrange and then the vertical post of the crosshair can be set parallel to the plum line. I use a heavy lead fishing weight on a nylon string and that works great for a simple plum line. The string and weights can be bought at Walmart or other sporting good stores locally.
The bigger problem I have had is setting the rifle vertically while mounting the scope. I used to use a bubble level that I set on the stock right behind the action but that didn't alway ensure that the scope was verically in line with the barrel. This would even work on some rifles since there weren't any flat places on action or stock to set a level. I have found two ways to address this problem, one is a bubble level that I can mount on the scope rails that will show when the action is level. The only problem with this method is that if the scope rails are not cut exactly on top of the rifle then the scope mount can be offset from the barrel causing some canting problems. Another potential problem is if the scope rings introduce some cant or offset from the rails. I have seen both of these problems in a variety of airguns, both cheap and expensive.
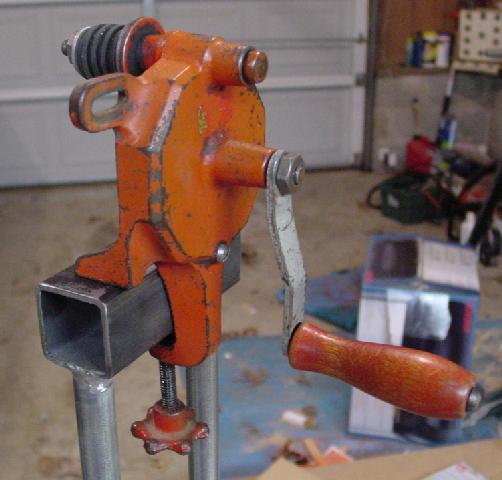
To avoid these problems I have started using a scope alignment tool that I bought from Warren Williamson last year. The tool has one notch in the bottom that sets on the barrel or action and another that rests on the top of the scope. A bubble level on top of the unit then shows when the scope and barrel are level with each other (see pic). A slot in the body allows viewing a plum line through the scope so that once the action and scope are aligned, the scope can be turned in the rings to align the crosshairs. This tool wasn't cheap, about $40, but it was well worth the money spent for me since I like to move scopes around on different guns and it certainly makes getting everything lined up much faster and easier.
Aligning the crosshairs vertically is a bit easier since a plum line can be hung 10-15 yards downrange and then the vertical post of the crosshair can be set parallel to the plum line. I use a heavy lead fishing weight on a nylon string and that works great for a simple plum line. The string and weights can be bought at Walmart or other sporting good stores locally.
The bigger problem I have had is setting the rifle vertically while mounting the scope. I used to use a bubble level that I set on the stock right behind the action but that didn't alway ensure that the scope was verically in line with the barrel. This would even work on some rifles since there weren't any flat places on action or stock to set a level. I have found two ways to address this problem, one is a bubble level that I can mount on the scope rails that will show when the action is level. The only problem with this method is that if the scope rails are not cut exactly on top of the rifle then the scope mount can be offset from the barrel causing some canting problems. Another potential problem is if the scope rings introduce some cant or offset from the rails. I have seen both of these problems in a variety of airguns, both cheap and expensive.
To avoid these problems I have started using a scope alignment tool that I bought from Warren Williamson last year. The tool has one notch in the bottom that sets on the barrel or action and another that rests on the top of the scope. A bubble level on top of the unit then shows when the scope and barrel are level with each other (see pic). A slot in the body allows viewing a plum line through the scope so that once the action and scope are aligned, the scope can be turned in the rings to align the crosshairs. This tool wasn't cheap, about $40, but it was well worth the money spent for me since I like to move scopes around on different guns and it certainly makes getting everything lined up much faster and easier.
Sunday, February 27, 2005
American Airgunners Are Lucky.
I got an email yesterday from a reader in the Philippines. His email was about his love of airgunning and the lack of quality airgun equipment and parts. He explained how he had to make his own match stocks from scrap hardwood that he found and tuned his locally made airguns with parts found in local auto parts stores. He describe the accuracy of his airguns as being able to shoot 6" groups at 20 meters and ended his email with a comment about how he would like to be born in his next life as an American so he could enjoy airgunning the way it should be.
That really got me to thinking how really lucky we are here in the USA to have such freedom to own and shoot high quality, high power airguns with very few restrictions. If an airgun here boasted of 6" groups it would sit on a shelf and collect dust, no one here would find that acceptable. Not only do we expect single hole groups at 10 yards, but we expect our airguns to shoot well over the power limits of most other coutries. Americans love more power and that is no exception with airguns. We don't have to deal with 12 ft. lbs. , 6 joule or any other arbitrary limits on the power of our airguns, nor should we. Most of these limits are set by know-it-alls in the socialist governments of other countries that don't know much about guns in general and airgun in particular. We are very fortunate to live in a country where the importing of quality airguns is still legal and not controlled or prevented by the government and I think we all take for granted how lucky we are that we have so much great equipment available to us everyday.
Perhaps as part of our exporting of democracy around the world we should get W and Condi to start promoting higher airgun power limits around the world and force countries closed to airgun import to open their markets. This can only make the lives of the general populace better. Lets start with the UK, Canada and Germany. Lets get their government to raise the power limits to 51 ft. lbs. for rifles and then open up closed markets to those new airguns and pretty soon, everyone will be shooting airguns and will be too busy to make war and love one another, lets give airguns a chance!
Ok, todays blog has deteriorated into a bit of silliness, but I really do feel very bless to live in America.
![]()