 American Airguns Blog
Friday, January 04, 2008
Target Sears
I have been working with field targets now for well over about 12 years. I think I have seen and just about every type of design out there and played with variations of them in my home shop. Some of the experimental designs worked really well and some didn’t work at all. One of the best designs is the over-center design that is used by the Knock-Over, Stoutenberg, Otten and Pounded Paddle targets. However, this design will allow the target to be knocked over with a split, especially with higher power rifles. That is a common problem with spring loaded targets.
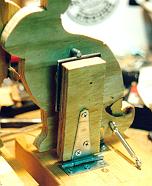 One of the first designs I used in my targets was the sear on the top of the paddle design. This is the design that was suggested to me by Rodney Boyce back in 1994. His idea was to angle the face back so the sear rested on the paddle and then gravity would pull the target face down. I refined the design to use a spring to pull the face down and lock up the sear so that splits wouldn’t take the target down so easily. This design worked great for the wood targets so I decided to try the same design with an all metal target. The design worked for the wood targets so it should work with a metal target too, right?
Well, yes and no. The design does work pretty well in all metal but there are a few differences that needed attention. The biggest problem with the metal design is that face hits could vibrate the target down. At first I used a piece of angle iron as the sear. The problem with the angle iron sear is that in order to allow the paddle to trip with a low energy level hit, a strike to the face plate about halfway down the face would trip the sear as well. Also, splits would take down the target easily. I tried increasing the spring strength and reducing it. I tried angling the target face back some and dampening the back of the target face with a wood backer. This all help some but didn’t completely cure the problem.
The solution to this problem came to me one night a few weeks ago while I lay in bed sick with a head virus. The real problem was that the friction on the sear pieces was too high. The sear engagement wasn’t enough to keep the face from rattling the sear open, very much like when a trigger is set to light and a bump to the butt of the rifle causes it to fire. On the wood targets I typically used a ¼” or 3/16” bolt extending from the target face to contact the top of the paddle which has a much lower resistance to the movement of the paddle.
I reasoned that if I were to use a piece of 1/8” steel and weld it to the faceplate so that the 1/8” edge would contact the paddle top it would reduce the resistance and allow the sear to be set farther back on the paddle. I also decided to round the edges of the 1/8” steel to further reduce the resistance and increase the sear engagement. I figured that the rounded edge would flatten some with use but that is would settle out quickly and stay consistent. I also measured the angle of the sear edge to make it 5 degrees above the horizontal to more closely match the wood target design.
I tested my theory with a new skunk faceplate. I mounted it on an old Juneau base that was laying around and installed the sear. The sear was adjusted to fall with about 3 ft. lbs. of energy which positioned the end of face plate sear all the way to the back of the paddle. At that position, the paddle could still be pushed to trip the target with little effort. The big test was with my .177 ProSport, the faceplate was shot with about 15 ft. lbs. of energy but the target didn’t fall. In fact, it barely moved. After about 20 shots with no face falls the face was shot with my ProElite which shoots about 22 ft. lbs. at the muzzle. After another 15-20 shots the target still didn’t trip.
I ran the target out to my 35 yard target stand and staked it down. The ProSport had no trouble knocking it over so I tried it with my 6 ft. lbs. Walther LGR. The first shot knocked it right over, as did second and third shot. I am going to continue testing and refining the new sear and see what other problems might crop up with it. So far though I am happy with the way it has turned out.
One of the first designs I used in my targets was the sear on the top of the paddle design. This is the design that was suggested to me by Rodney Boyce back in 1994. His idea was to angle the face back so the sear rested on the paddle and then gravity would pull the target face down. I refined the design to use a spring to pull the face down and lock up the sear so that splits wouldn’t take the target down so easily. This design worked great for the wood targets so I decided to try the same design with an all metal target. The design worked for the wood targets so it should work with a metal target too, right?Well, yes and no. The design does work pretty well in all metal but there are a few differences that needed attention. The biggest problem with the metal design is that face hits could vibrate the target down. At first I used a piece of angle iron as the sear. The problem with the angle iron sear is that in order to allow the paddle to trip with a low energy level hit, a strike to the face plate about halfway down the face would trip the sear as well. Also, splits would take down the target easily. I tried increasing the spring strength and reducing it. I tried angling the target face back some and dampening the back of the target face with a wood backer. This all help some but didn’t completely cure the problem.
The solution to this problem came to me one night a few weeks ago while I lay in bed sick with a head virus. The real problem was that the friction on the sear pieces was too high. The sear engagement wasn’t enough to keep the face from rattling the sear open, very much like when a trigger is set to light and a bump to the butt of the rifle causes it to fire. On the wood targets I typically used a ¼” or 3/16” bolt extending from the target face to contact the top of the paddle which has a much lower resistance to the movement of the paddle.
I reasoned that if I were to use a piece of 1/8” steel and weld it to the faceplate so that the 1/8” edge would contact the paddle top it would reduce the resistance and allow the sear to be set farther back on the paddle. I also decided to round the edges of the 1/8” steel to further reduce the resistance and increase the sear engagement. I figured that the rounded edge would flatten some with use but that is would settle out quickly and stay consistent. I also measured the angle of the sear edge to make it 5 degrees above the horizontal to more closely match the wood target design.
I tested my theory with a new skunk faceplate. I mounted it on an old Juneau base that was laying around and installed the sear. The sear was adjusted to fall with about 3 ft. lbs. of energy which positioned the end of face plate sear all the way to the back of the paddle. At that position, the paddle could still be pushed to trip the target with little effort. The big test was with my .177 ProSport, the faceplate was shot with about 15 ft. lbs. of energy but the target didn’t fall. In fact, it barely moved. After about 20 shots with no face falls the face was shot with my ProElite which shoots about 22 ft. lbs. at the muzzle. After another 15-20 shots the target still didn’t trip.
I ran the target out to my 35 yard target stand and staked it down. The ProSport had no trouble knocking it over so I tried it with my 6 ft. lbs. Walther LGR. The first shot knocked it right over, as did second and third shot. I am going to continue testing and refining the new sear and see what other problems might crop up with it. So far though I am happy with the way it has turned out.
![]()