 American Airguns Blog
Tuesday, March 14, 2006
Gravity
I really enjoy designing and making stuff in my garage, especially stuff for my airgun addiction. I recently bought TurboCad 3D for the PC so now I can layout my projects in 2D&3D before I actually make them. One project I did recently was to redesign my field target design that has the sear at the top of the paddle arm. This is the same design that I used with the old wood targets that I used to make before I got my welder. The two big changes I have made is to allow the target face to lean back a few degrees, which helps reduce sweet spots on the target face, and the other it to attach the target face spring from the bottom of the paddle arm instead of to the target base. I can’t take credit for thinking of this design however. I “borrowed” the idea from a target design that was shown to me by Wade Sutherland this past year.
The target works basically the same as the original design with two exceptions. With this design, the paddle arm is pulled forward by the spring so that when the face plate is hit, there is less chance of the paddle rattling free so the trip level can be set lower without a faceplate hit taking down the target. The other big advantage is that with the paddle arm attached to the target face, the through-the-face reset string can be eliminated. A small reset arm can be attached to the face plate so that when the face is pulled up the paddle arm comes up with it. The setup works really well.
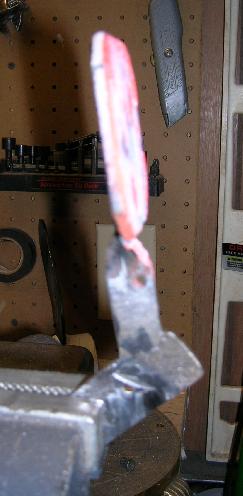
I have several Juneau and British made gravity fall targets left over from a batch of targets I obtained from my old club in Florida. I was looking at the basic setup of the paddle arm and it occurred to me that I could apply my new target design to those old targets and convert them over to a spring loaded target.

 The conversion process wasn’t very complicated. The first thing to do was remove the faceplate pull-down arm and sear catch from the face plate. I used my grinder to grind down the welds and then a hammer to break the pieces free from the face. The next step was to remove the paddle arm and cut off the sear protrusion from the front of the paddle arm. Now the target is ready to have a few pieces added to it.
 Since a spring needs to be added between the paddle arm and face, I added a spring rod to the paddle arm. This was done first so that the location of the spring rod for the face can be determined properly. The paddle arm spring rod was welded to the paddle arm about 1” above the pivot point on the rear side of the paddle arm. The springs I had on hand were 1 ¼” springs with a max extension of 2” so I measured 2” up on the face from the paddle arm spring rod and marked the spot for the face plate spring rod and welded the spring rod to the face.

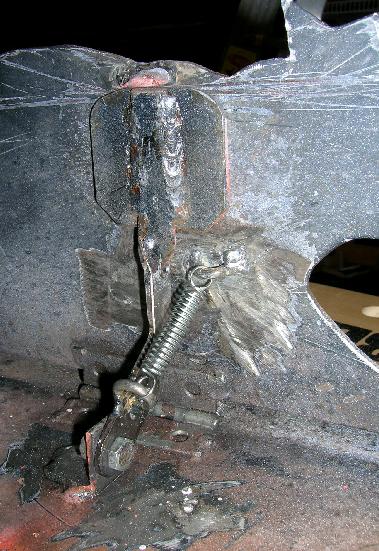 While the paddle arm was removed, the top of the paddle was ground down flat for about ½” to make part of the sear. With the paddle arm attached and the spring installed, the target face was leaned back about 5 degrees and the paddle arm was allow to be pulled forward into the faceplate. The top sear has to be welded to the face where the paddle meets the face. A piece of 1/8” or 3/16” steel can be used for the top sear. I used 1/8” steel that was 3/8” wide. I beveled the edge that would contact the sear about 5 degrees and smoothed over edge with a file before clamping it to the face where the paddle arm contacted it. With the top sear welded, the only thing left was to was to weld the reset arm to the face. With that, the conversion was complete.
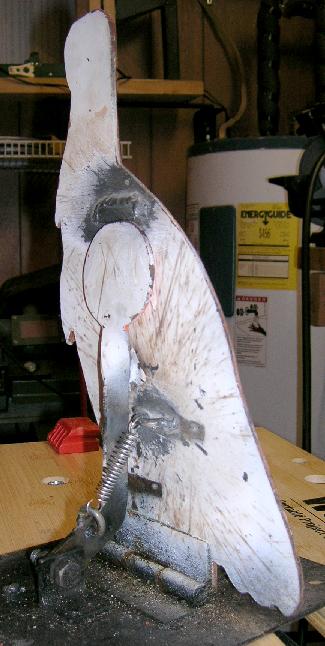 The conversion time took me about 45 minutes. All I needed to do the conversion was a grinder, file, hack saw, and a welder. The new target mechanism works very well, it will trip with about 3.5 ft lbs of energy without a full power faceplate hit taking it down. One option that could be added is a sear adjustment screw, which could be added to the bottom corner of the paddle. However, the two targets I have converted so far (the other is a turkey) didn't need the additional sear adjustment screw. I will continue to test these targets on my home range and at our club to see the long term affects of the new mechanism. Gravity type targets work great when setup properly but if you prefer spring loaded targets, this is a pretty easy conversion to perform that will change your gravity targets to spring loaded.
The target works basically the same as the original design with two exceptions. With this design, the paddle arm is pulled forward by the spring so that when the face plate is hit, there is less chance of the paddle rattling free so the trip level can be set lower without a faceplate hit taking down the target. The other big advantage is that with the paddle arm attached to the target face, the through-the-face reset string can be eliminated. A small reset arm can be attached to the face plate so that when the face is pulled up the paddle arm comes up with it. The setup works really well.
I have several Juneau and British made gravity fall targets left over from a batch of targets I obtained from my old club in Florida. I was looking at the basic setup of the paddle arm and it occurred to me that I could apply my new target design to those old targets and convert them over to a spring loaded target.


 The conversion process wasn’t very complicated. The first thing to do was remove the faceplate pull-down arm and sear catch from the face plate. I used my grinder to grind down the welds and then a hammer to break the pieces free from the face. The next step was to remove the paddle arm and cut off the sear protrusion from the front of the paddle arm. Now the target is ready to have a few pieces added to it.
 Since a spring needs to be added between the paddle arm and face, I added a spring rod to the paddle arm. This was done first so that the location of the spring rod for the face can be determined properly. The paddle arm spring rod was welded to the paddle arm about 1” above the pivot point on the rear side of the paddle arm. The springs I had on hand were 1 ¼” springs with a max extension of 2” so I measured 2” up on the face from the paddle arm spring rod and marked the spot for the face plate spring rod and welded the spring rod to the face.
 While the paddle arm was removed, the top of the paddle was ground down flat for about ½” to make part of the sear. With the paddle arm attached and the spring installed, the target face was leaned back about 5 degrees and the paddle arm was allow to be pulled forward into the faceplate. The top sear has to be welded to the face where the paddle meets the face. A piece of 1/8” or 3/16” steel can be used for the top sear. I used 1/8” steel that was 3/8” wide. I beveled the edge that would contact the sear about 5 degrees and smoothed over edge with a file before clamping it to the face where the paddle arm contacted it. With the top sear welded, the only thing left was to was to weld the reset arm to the face. With that, the conversion was complete.
 The conversion time took me about 45 minutes. All I needed to do the conversion was a grinder, file, hack saw, and a welder. The new target mechanism works very well, it will trip with about 3.5 ft lbs of energy without a full power faceplate hit taking it down. One option that could be added is a sear adjustment screw, which could be added to the bottom corner of the paddle. However, the two targets I have converted so far (the other is a turkey) didn't need the additional sear adjustment screw. I will continue to test these targets on my home range and at our club to see the long term affects of the new mechanism. Gravity type targets work great when setup properly but if you prefer spring loaded targets, this is a pretty easy conversion to perform that will change your gravity targets to spring loaded.
![]()