 American Airguns Blog
Thursday, March 02, 2006
Gamo is one of the largest manufacturers of youth and adult airguns worldwide. Their air rifles are good quality and capable of reasonably good accuracy. The Gamo trigger however is terrible. It is a pseudo 2 stage trigger in that the first stage doesn’t move the sear during it’s travel, it only moves against spring pressure. On top of that, Gamo makes a semi-circular cut into the lower sear arm so that the trigger blade has to be pulled almost up into the trigger to fire the rifle, well that may be a bit of an exaggeration but the travel is set so long that trigger control suffers. The trigger does actually start traveling upward before the rifle fires. This makes shooting accurate groups very difficult. I can understand Gamo’s concern with shooters adjusting the trigger and having it accidentally discharging but there has to be a better way.
 Well, there is. For a couple of years now Bob Werner at Charlie’s Springer Works has been selling a replacement trigger blade for the Gamo style trigger. Bob trigger is called the MK-II-GTX Trigger. It replaces the standard Gamo trigger blade and turns the pseudo 2 stage trigger into a real 2 stage trigger. I had been telling readers of my website about the trigger but I had never actually tried it myself so I figured I should try it out before I recommend it to others. So, I headed down to Walmart and got me a Gamo Shadow 1000 and then bought a GTX trigger from Bob.
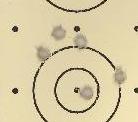
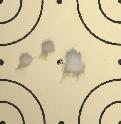
 I cleaned the barrel and fired a few hundred rounds through the Gamo before sitting down to test the accuracy of the rifle with the standard trigger. I decided not to shoot off a rest but from a seated position to get more typical groups from a hunting or plinking type position. The groups at 25 yards weren’t very impressive, averaging 1”-1 ½” and the groups themselves weren’t positioned very consistently on the target.
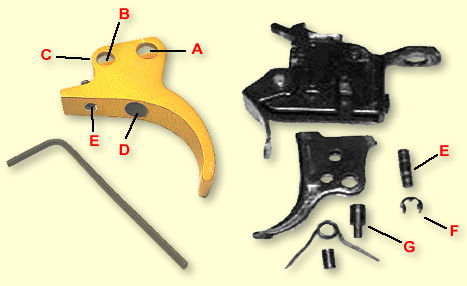
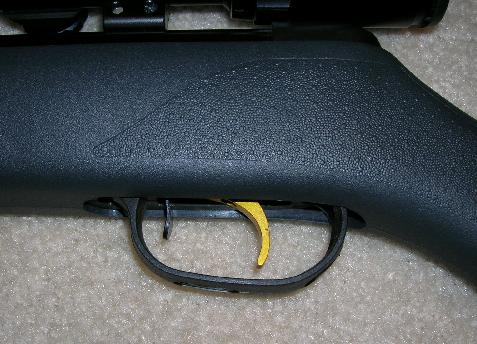 After shooting some test groups, I installed the new GTX trigger. After removing the stock an E-clip was removed from the trigger pivot pin and the pin was removed. Then the original trigger was pulled out along with a few other parts, including the old adjustment screw. The GTX trigger was then slide up in the trigger unit with a couple of the original parts and the pivot pin was replaced and it was done. It took about as long to remove and replace the stock as it did to install the GTX trigger. There are more detailed installation instructions on Bob website for those who want to read the full installation description.
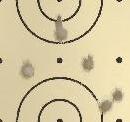
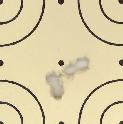 The trigger comes pre-adjusted by Bob so with just a little tweaking I had it adjusted as best as I could get it and headed out to perform some accuracy tests. It definitely made a big improvement. The groups shrunk to about half the size of the original trigger, averaging ½”-¾” with more consistent group placement on the target.
The GTX definitely improves the performance of the Gamo type trigger units, however it isn’t a miracle worker. I tried my best to adjust out second stage creep but I couldn’t get rid of all of it and that is partly due to the trigger unit design. The trigger travel was much shorter and much more controllable with the GTX trigger.
The only knock I had against the GTX trigger was that the edges weren’t smoothed very well. I found them rather sharp and I had to take a file to the edges on the blade to smooth and round them a bit to increase the comfort level. A little time spent rounding the edges at the factory would be time well spent.
I have email and talked with Gamo many times over the years about their triggers (as I am sure other have too) but it has fallen on deaf ears. I get a lot of email from people who are looking for an inexpensive but reliable air rifle for plinking and vermin control. I hesitated recommending Gamo air rifles because of the terrible trigger. With a GTX trigger, I can feel confident recommending Gamo to my readers and know that the user will be able to reliably hit what they aim at, that is if they do their part!
 Well, there is. For a couple of years now Bob Werner at Charlie’s Springer Works has been selling a replacement trigger blade for the Gamo style trigger. Bob trigger is called the MK-II-GTX Trigger. It replaces the standard Gamo trigger blade and turns the pseudo 2 stage trigger into a real 2 stage trigger. I had been telling readers of my website about the trigger but I had never actually tried it myself so I figured I should try it out before I recommend it to others. So, I headed down to Walmart and got me a Gamo Shadow 1000 and then bought a GTX trigger from Bob.
 I cleaned the barrel and fired a few hundred rounds through the Gamo before sitting down to test the accuracy of the rifle with the standard trigger. I decided not to shoot off a rest but from a seated position to get more typical groups from a hunting or plinking type position. The groups at 25 yards weren’t very impressive, averaging 1”-1 ½” and the groups themselves weren’t positioned very consistently on the target.
 After shooting some test groups, I installed the new GTX trigger. After removing the stock an E-clip was removed from the trigger pivot pin and the pin was removed. Then the original trigger was pulled out along with a few other parts, including the old adjustment screw. The GTX trigger was then slide up in the trigger unit with a couple of the original parts and the pivot pin was replaced and it was done. It took about as long to remove and replace the stock as it did to install the GTX trigger. There are more detailed installation instructions on Bob website for those who want to read the full installation description.
 The trigger comes pre-adjusted by Bob so with just a little tweaking I had it adjusted as best as I could get it and headed out to perform some accuracy tests. It definitely made a big improvement. The groups shrunk to about half the size of the original trigger, averaging ½”-¾” with more consistent group placement on the target.
The GTX definitely improves the performance of the Gamo type trigger units, however it isn’t a miracle worker. I tried my best to adjust out second stage creep but I couldn’t get rid of all of it and that is partly due to the trigger unit design. The trigger travel was much shorter and much more controllable with the GTX trigger.
The only knock I had against the GTX trigger was that the edges weren’t smoothed very well. I found them rather sharp and I had to take a file to the edges on the blade to smooth and round them a bit to increase the comfort level. A little time spent rounding the edges at the factory would be time well spent.
I have email and talked with Gamo many times over the years about their triggers (as I am sure other have too) but it has fallen on deaf ears. I get a lot of email from people who are looking for an inexpensive but reliable air rifle for plinking and vermin control. I hesitated recommending Gamo air rifles because of the terrible trigger. With a GTX trigger, I can feel confident recommending Gamo to my readers and know that the user will be able to reliably hit what they aim at, that is if they do their part!
![]()