 American Airguns Blog
Friday, April 15, 2005
Scope Height
I have been moving scopes about on a couple of my rifles this past week. As part of my preping some of my rifles for the shooting season, I made a few trajectory charts for the rifles with their new scopes. It hit me that one of the major factors required for all trajectory programs is the height of the center of the scope from the center of the rifel bore. If this parameter isn't measure accurately all the number the programs spits out are worthless.
To measure the correct scope height, I like to use a set of calipers and measure the different segments of the scope height individulally and then add them togetther. Scope tube, most scopes are 1" or 30mm so you can take that value and divide it by 2 and that is the first measurement. I don't have any 30mm scopes right now so I start with .5" for the scope tube. Another segment is the size of the barrel, which can be measured directly by putting the calipers on it, measuring and again, dividing the value by 2. My R9 barrel measured .625 so the bore center would be 0.3125".
The next segment is the measurement from the bottom of the scope to the top of the barrel. This can be an easy or hard measurement, depending on the rifle. For many pcp rifles the scope extends right out over the bore so the measurement can be made using the calipers to measure the distance from the barrel to the scope. However it can get tricky on piston guns where the scope sets over the receiver and the barrel isn't level with the top of the barrel. I haven't come up with a sure fire way to measure this yet. I many cases I can use my calipers to make a very close measurement of the distance from the top of the barrel to the top of the receiver and then add that to the measurement from the top of the receiver to the bottom of the scope. In other cases I have to use an accurate straight rule to get the measurement.
Once all the values are established they are added together to get the total measurement from the center of the bore to the center of the scope. It will vary from gun to gun and from mount to mount. My R9 with Sportsmatch low mounts measure 1.44" while the same mounts on my TX200HC measured 1.81" This number can then be used to get some trajectory numbers from the computer which are just an estimate of the path of the pellet so always be sure to verify your number by shooting them on the range.
Tuesday, April 12, 2005
Target Stock Upgrade
I have written in the past about my Maccari target stocks that I have for my HW97 rifles. I have two of them and decided to finally do something about the grip on my primary rifle stock. The grip on the Maccari stock is cut way back on to allow the machine to cut the trigger guard inletting. It makes it difficult for someone with small hands, like me, to hold the grip and reach the trigger. I decided to see what I could do to rectify the problem.
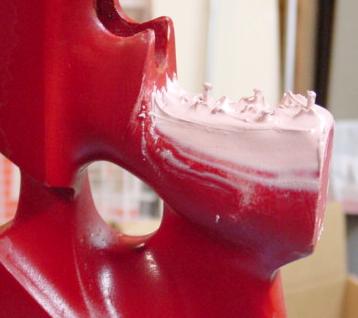
 I went to a local Home Depot and told them that I wanted to build up the area on my pistol grip and the associate that I spoke with recommend Bondo. Yes Bondo, the same stuff used for repairing cars can also be used for repairing wood. I decided to give it a try. Bondo comes in two parts, the main filler material and a hardener which are mixed just prior to use. I started my modification by first sanding off all the existing paint and cleaning the grip area. I then pounded some small nails into the grip to give the Bondo a bit more of an anchor. I decided that since the filler material wasn't very firm that I would apply the Bondo in small amounts in layers and gradually build up the grip. In addition to building the front of the grip I also wanted to add more material to the side of the grip so that my hand will have a raised area to rest on when I shoot from the FT position.
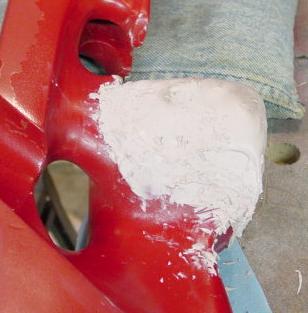 It took about 5 applications to the front of the grip and a few more to the side to get enough Bondo on it to start shaping the new grip. I applied an extra layer so that I could have a bit more leeway when I started to shape the grip. The Bondo sets up in about 5 minutes and is hard after about 30 minutes so this process only took a couple of days. Since I was putting it on thicker than is normal, I allowed for a few hours of drying time between layers.
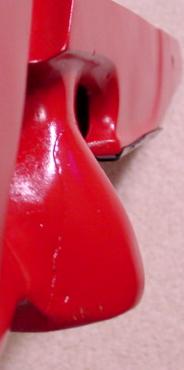
 Once all the layers were applied, some coarse sandpaper and a belt sander shaped the grip and removed the excess material. Some 100 grip finished the shaping and that was followed by fine and extra fine to get a nice smooth finish. The entire stock was going to need to be repainted so I hit the rest of the stock lightly with some 220 grit and painted the whole thing.
I was able to use the upgraded stock at the Cajun Classic and the new configuration worked great. With the new thigh rest and grip, I was better able to get into position comfortably while holding the rifle steadier and with a lot less fatigue by the end of the match. I am really glad that I finally took the step to rework my grip.

 I went to a local Home Depot and told them that I wanted to build up the area on my pistol grip and the associate that I spoke with recommend Bondo. Yes Bondo, the same stuff used for repairing cars can also be used for repairing wood. I decided to give it a try. Bondo comes in two parts, the main filler material and a hardener which are mixed just prior to use. I started my modification by first sanding off all the existing paint and cleaning the grip area. I then pounded some small nails into the grip to give the Bondo a bit more of an anchor. I decided that since the filler material wasn't very firm that I would apply the Bondo in small amounts in layers and gradually build up the grip. In addition to building the front of the grip I also wanted to add more material to the side of the grip so that my hand will have a raised area to rest on when I shoot from the FT position.
 It took about 5 applications to the front of the grip and a few more to the side to get enough Bondo on it to start shaping the new grip. I applied an extra layer so that I could have a bit more leeway when I started to shape the grip. The Bondo sets up in about 5 minutes and is hard after about 30 minutes so this process only took a couple of days. Since I was putting it on thicker than is normal, I allowed for a few hours of drying time between layers.
 Once all the layers were applied, some coarse sandpaper and a belt sander shaped the grip and removed the excess material. Some 100 grip finished the shaping and that was followed by fine and extra fine to get a nice smooth finish. The entire stock was going to need to be repainted so I hit the rest of the stock lightly with some 220 grit and painted the whole thing.
I was able to use the upgraded stock at the Cajun Classic and the new configuration worked great. With the new thigh rest and grip, I was better able to get into position comfortably while holding the rifle steadier and with a lot less fatigue by the end of the match. I am really glad that I finally took the step to rework my grip.
![]()